Content1. Mold Bases & Inserts (What They Are)2. Market Size (Proxies & Context)3. Typical U...
Multi-Material Overmolding for Automotive Applications: Techniques & Best Practices
2025-10-15
In the evolving world of automotive manufacturing, overmolding (or multi-material injection molding) has become an increasingly vital technique to achieve high integration, improved performance, and aesthetic flexibility. By combining multiple materials or substrates into one unified part, automotive engineers can reduce assembly steps, improve durability, and deliver more compact designs. In this article, we explore the techniques, challenges, and best practices of multi-material overmolding in automotive applications, with a focus on how precise temperature control and mold design can make or break success.
Introduction: Why Overmolding Matters in Auto Manufacturing
Automotive parts are under constant pressure to be lighter, more functional, and visually appealing. Traditional multi-part assemblies—e.g., rigid frame + soft sealing, or rigid plastic + overmolded soft touch areas—carry costs, tolerance stackups, and assembly complexity. Overmolding or multi-shot injection molding enables these combinations in a single, integrated process.
For automotive use cases, the benefits include:
Reduced assembly & labor cost — fewer components to join.
Improved reliability — eliminating interfaces reduces leak paths, mechanical failures.
Tailored functionality — combining rigid and soft materials, overmolding sensor housings, seals, or grips.
Aesthetic flexibility — color, texture, and surface transitions built into molding.
However, automotive-scale overmolding is technically demanding—especially when integrating temperature control, mold design, and material compatibility. Below, we dive into the methods and key considerations.
Typical Automotive Overmolding Applications & Use Cases
To ground the technology, here are some common automotive overmolding scenarios:
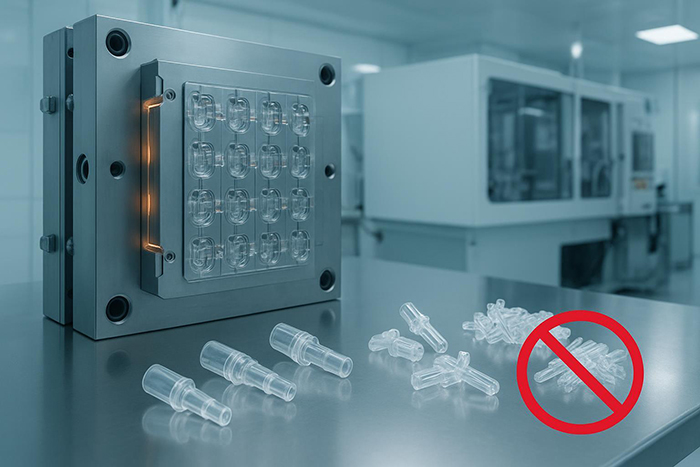
Sensor enclosures & housings: e.g., a rigid plastic substrate overmolded with a soft elastomeric gasket or sealing lip.
Soft-touch control surfaces: overmolding soft thermoplastic elastomers (TPE/TPU) on hard plastic buttons, steering wheel trims, or interior accents.
Insert + overmold combinations: combining metal inserts (bushings, screws) or rigid plastic cores with overmolded elastomers for sealing or cushioning.
Exterior trim sealing edges: overmolding flexible lips or sealing features onto bumpers or fascia parts.
Vibration damping / acoustic parts: overmolded rubber zones on rigid supports to absorb vibration or improve NVH (noise, vibration, harshness).
These applications demand tight tolerances, strong bonding at interfaces, and robust mold and thermal control.
Overmolding Techniques: Which Approach Fits Best?
There are multiple technical routes to achieve multi-material injection molded parts. Choosing the right one depends on volume, cost, complexity, and material compatibility.
Insert Overmolding (Pick-and-Place Overmolding)
In insert overmolding, a pre-molded substrate (or insert, which may be plastic, metal, or composite) is placed (manually or robotically) into a second mold, and a second material is injected around it. This approach:
Uses two separate molds (or mold halves)
Is more flexible and lower cost for prototyping or low to medium volume
Poses challenges in maintaining substrate temperature, cleanliness, and surface activation for bonding
Often requires precise fixturing to hold substrate during overmolding
This is often the go-to when volume doesn’t justify complex multi-shot tooling.
Two-Shot / 2K Molding (Sequential Multi-Material)
In two-shot (or 2K) injection molding, two (or more) materials are injected in sequence within the same mold setup or transfer mechanism. Key features:
Only one mold (or one mold assembly) is used, reducing misalignment risk
Material transfer (robotic, rotary table, or sliding cores) moves the first-shot substrate to the second shot
Bonding is often stronger because the second shot is applied while the first is still warm
Better suited for high-volume runs to amortize tooling cost
Drawback: tooling is more complex, and initial investment is higher.
Multi-Shot / Multi-Material Injection Molding
When you require three or more materials, multi-shot molding (or multi-material injection molding) is employed. This is an extension of two-shot principles:
Multiple injection stages or units, with sequential or simultaneous injection.
Enables complex gradients, soft-hard-soft arrangements, or more than two materials in one part.
Often requires very sophisticated mold and machine setups.
Enables maximal functional integration but with high tooling risk.
Material Compatibility & Interface Bonding Strategies
Successful overmolding depends critically on how well the substrate (first material) and overmold (second material) bond. Poor bonding leads to delamination, peeling, or failure under mechanical stress.
Material Pairing & Thermal Considerations
The substrate material typically has a higher melting point (or glass transition) than the overmold, so the second shot doesn’t remelt or warp the first.
Common substrate materials include ABS, PC/ABS, PA, PBT, PC, and their blends.
Overmold materials often include TPE, TPU, liquid silicone rubber (LSR), or softer thermoplastics.
Some substrate–overmold combinations may inherently bond; others require interface treatments.
Chemical Bonding vs. Mechanical Locking
Chemical bonding: relies on molecular chain entanglement, diffusion, or compatibility between materials. Good wetting, temperature matching and proper melt state help.
Mechanical locking: when chemical bonding is weak or materials are incompatible, designers may use undercuts, dovetails, ribs, microstructures, or flow-through holes to “lock” the overmold to the substrate physically.
Surface Treatments & Interface Preparation
Surface roughening/texturing: increasing contact area helps adhesion.
Plasma/corona treatment: can enhance surface energy and bondability.
Adhesive primers: used sparingly if needed, though ideal overmolding avoids adhesives.
Cleaning/degreasing/handling control: contamination on substrate surfaces can ruin bonding, especially in insert overmolding workflows.
When properly done, the overmold and substrate act as a unified part.
Mold Design & Thermal Control Strategies
Even if materials and interface design are excellent, poor mold design or temperature control can thwart success. In automotive overmolding, temperature precision often becomes the linchpin.
Mold Layout & Movement Mechanisms
Rotary platens/indexing molds: common for two-shot setups where the first shot rotates to a second station.
Core-back / slide mechanisms: In some designs, a sliding or retracting core opens space for overmolding.
Transfer robots: for more complex or multi-shot molds, substrates may be robotically moved.
Maintain tight alignment and registration between shots to avoid binding or misalignment.
Runner System & Flow Strategy
Use hot runners for overmolding to avoid frozen runners affecting flow.
Consider separate gate locations for overmold shot to minimize interference with the first-shot geometry.
Ensure flow paths for second materials minimize shear, pressure drop, and uneven filling.
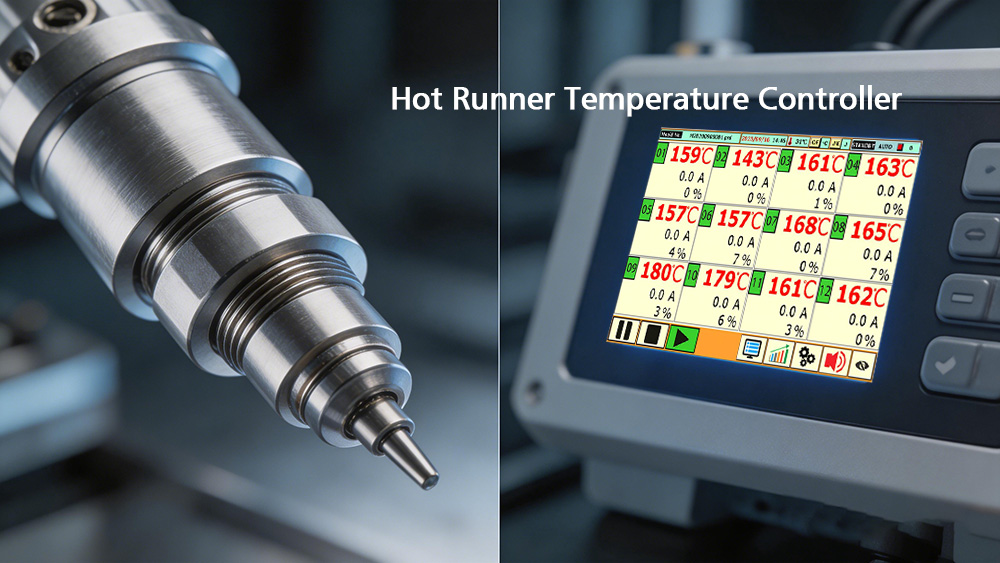
Temperature Control & Thermal Balancing
Independent temperature circuits for the substrate mold cavity and overmold cavity help maintain heat balance.
The substrate cavity may need to be maintained at a slightly elevated temperature to ensure the second shot bonds well without prematurely cooling.
Use high-precision mold temperature controllers or modular temperature control units to maintain stability in thermally complex molds.
Design cooling channels to optimize heat extraction while preventing warp or residual stress.
Given the thermal complexity in multi-material overmolding, your company’s expertise in thermal controllers/heat management systems can play a significant role in ensuring consistent part quality.
Mold Material & Surface Treatment
Tool steels with high thermal conductivity (e.g., beryllium-copper inserts) can help maintain uniform temperatures.
Surface coatings (Ni, DLC, chrome) can reduce wear, friction, and facilitate demolding.

Key Process Parameters & Control
Overmolding demands tight control over injection and processing parameters. Here are critical levers:
Injection Sequence, Timing & Cooling
The second shot should often occur while the first shot is still thermally alive (i.e., before it cools entirely) to promote bonding.
Delay too long, and chemical bonding may degrade.
Cooling times must be managed so that the first part retains adequate heat, but the overmold solidifies well.
Pressure, Holding & Back Pressure
Moderate injection pressure ensures full cavity fill without over-stressing the substrate.
Holding / packing pressure should balance interface bonding and avoid excessive stress on the first shot.
Back pressure on first shot melt can improve melt consistency and reduce voids.
Flow Rate, Shear & Melt Temperature
Control the melt temperature carefully: too high a temperature may degrade the substrate, while too low a temperature will impair wetting and adhesion.
Shear rates should be optimized to avoid thermal degradation.
Maintain uniform melt front for even bonding.
Real-Time Monitoring & Feedback Control
Use embedded thermocouples, pressure sensors, and flow sensors to monitor key parameters.
Closed-loop feedback systems can adaptively adjust temperatures or pressures to maintain consistency.
In automotive production, small deviations can cascade into defects; thus, process monitoring is essential.
Common Defects in Automotive Overmolding & How to Mitigate
Here are typical failure modes and mitigation strategies in automotive overmolding:
| Defect | Likely Cause | Mitigation Strategy |
| Delamination/peeling | Poor bonding, mismatch in materials, and cooling too much before overmolding | Reevaluate interface design, use mechanical locking, ensure second shot while substrate still warm |
| Short shot / incomplete fill | Poor flow, low pressure, frozen runner | Increase injection pressure, adjust gate design, preheat mold |
| Bubbles/voids | Trapping air, moisture in material | Pre-dry materials, vent mold, reduce shear |
| Warp/distortion | Uneven cooling, residual stress, mismatched thermal expansion | Improve cooling design, balance temperatures, soften transitions |
| Flash/burrs | Misalignment, excessive pressure | Tighten mold tolerances, reduce overpressure |
| Stress cracking / micro-cracks | High internal stresses, incompatible material shrinkage | Adjust packing profile, use stress-relief features, match shrinkage |
Future Trends & Innovations in Automotive Overmolding
The field continues to evolve, offering opportunities for differentiation:
Smart / Adaptive Mold Temperature Control: Using sensors and adaptive control logic to dynamically adjust mold temperatures per shot.
Digital twins & simulation-led design: Simulating multi-material flow and thermal behavior to minimize trial-and-error.
Hybrid 3D-printed molds + overmolding: Rapid-turn 3D printed insert molds for prototyping of overmolding designs.
New materials / bio-based elastomers: More bondable, recyclable, or sustainable overmolding materials.
Micro overmolding & precision overmolding: Miniaturizing overmolding for sensors, MEMS, and micro components.
Conclusion & Strategic Takeaways
Multi-material overmolding in automotive injection molding unlocks powerful integration, functional benefits, and aesthetic flexibility. But to make it succeed in a demanding environment, every element must align: material compatibility, mold design, temperature control, process parameters, and monitoring.
From interface chemistry to thermal control, the devil is in the details. By combining your company’s strength in temperature control and precise mold systems with robust overmolding design principles, you can deliver differentiated automotive components that outperform simpler multi-part assemblies.